
The Complete Guide to Using Facebook Events to Promote Your Business (Best Practices and Strategies)
/
The Complete Guide to Using Facebook Events to Promote Your Business
With Facebook now strongly encouraging businesses to make the site somewhere that fans and customers gather to engage in tight-knit communities and meaningful conversations, Facebook Events has emerged as a highly valuable tool for marketers to spread awareness, attract new customers, and strengthen brand loyalty.
In this post, I'm going to explain everything you need to know about Facebook Events, and how to use them in the most effective way, first to boost attendance to the event, but ultimately to increase interest and long-term value for your business. First though, the basics:
What Are Facebook Events?
Setting up a Facebook Event from your Page makes it easy for people to find your business' upcoming event, whether it's happening online or in the real worldwide. It could be a comedy night at your bar, a special sale to celebrate Thanksgiving, or the launch of a new product. Whatever the occasion,
Facebook says that 500 million people use Facebook Events each month to market their events, and 35 million people view a public event on Facebook each day. Events can be used to reach your audience, increase attendance, and build a stronger community around your brand.
How to Setup And Optimise A Facebook Event Post
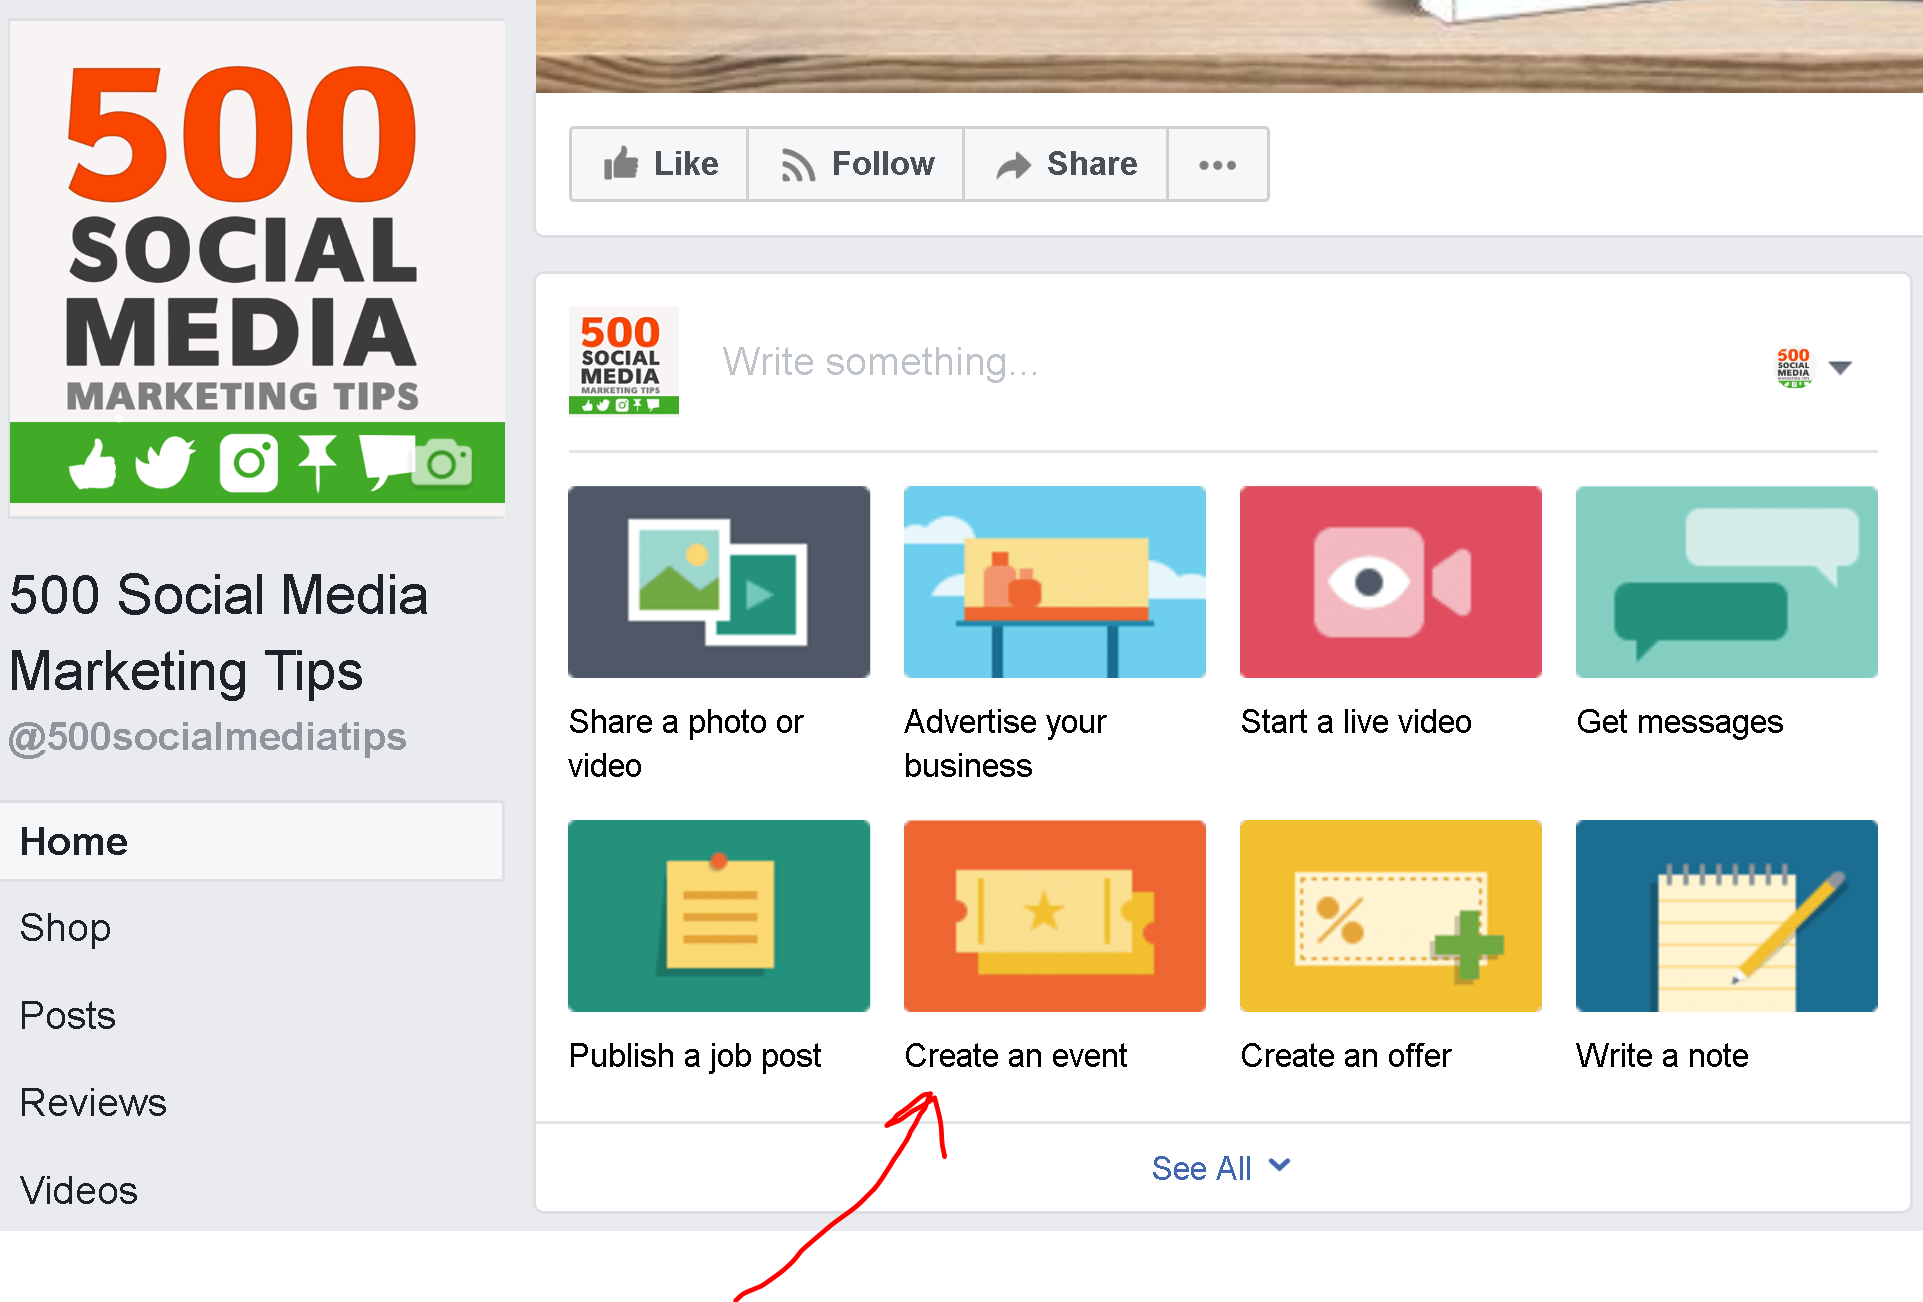
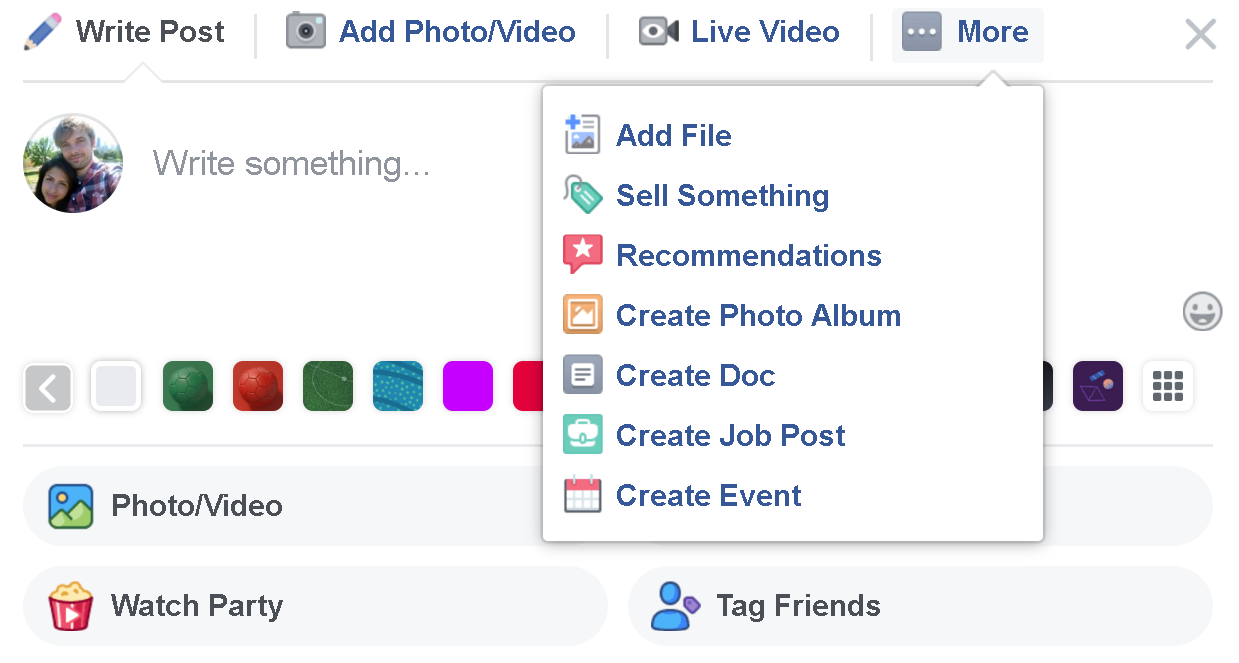
To create a private or public event, select Create Event from the status box on your Page.
Alternatively, you can click the three little dots next to the Share button at the top of your Page and choose Create Event from the drop-down menu. On mobile, tap the "Event" icon at the top of your Page. Same result either way!
Note: You can also create an event specifically tailored to members of a Facebook Group

On Desktop, you'll find the Create Event option under the "More" section of the status update box in your Group. On mobile, visit the Events tab of your Group and hit "Create".
But we'll be focusing on Pages here, so it's time to start setting up your Event
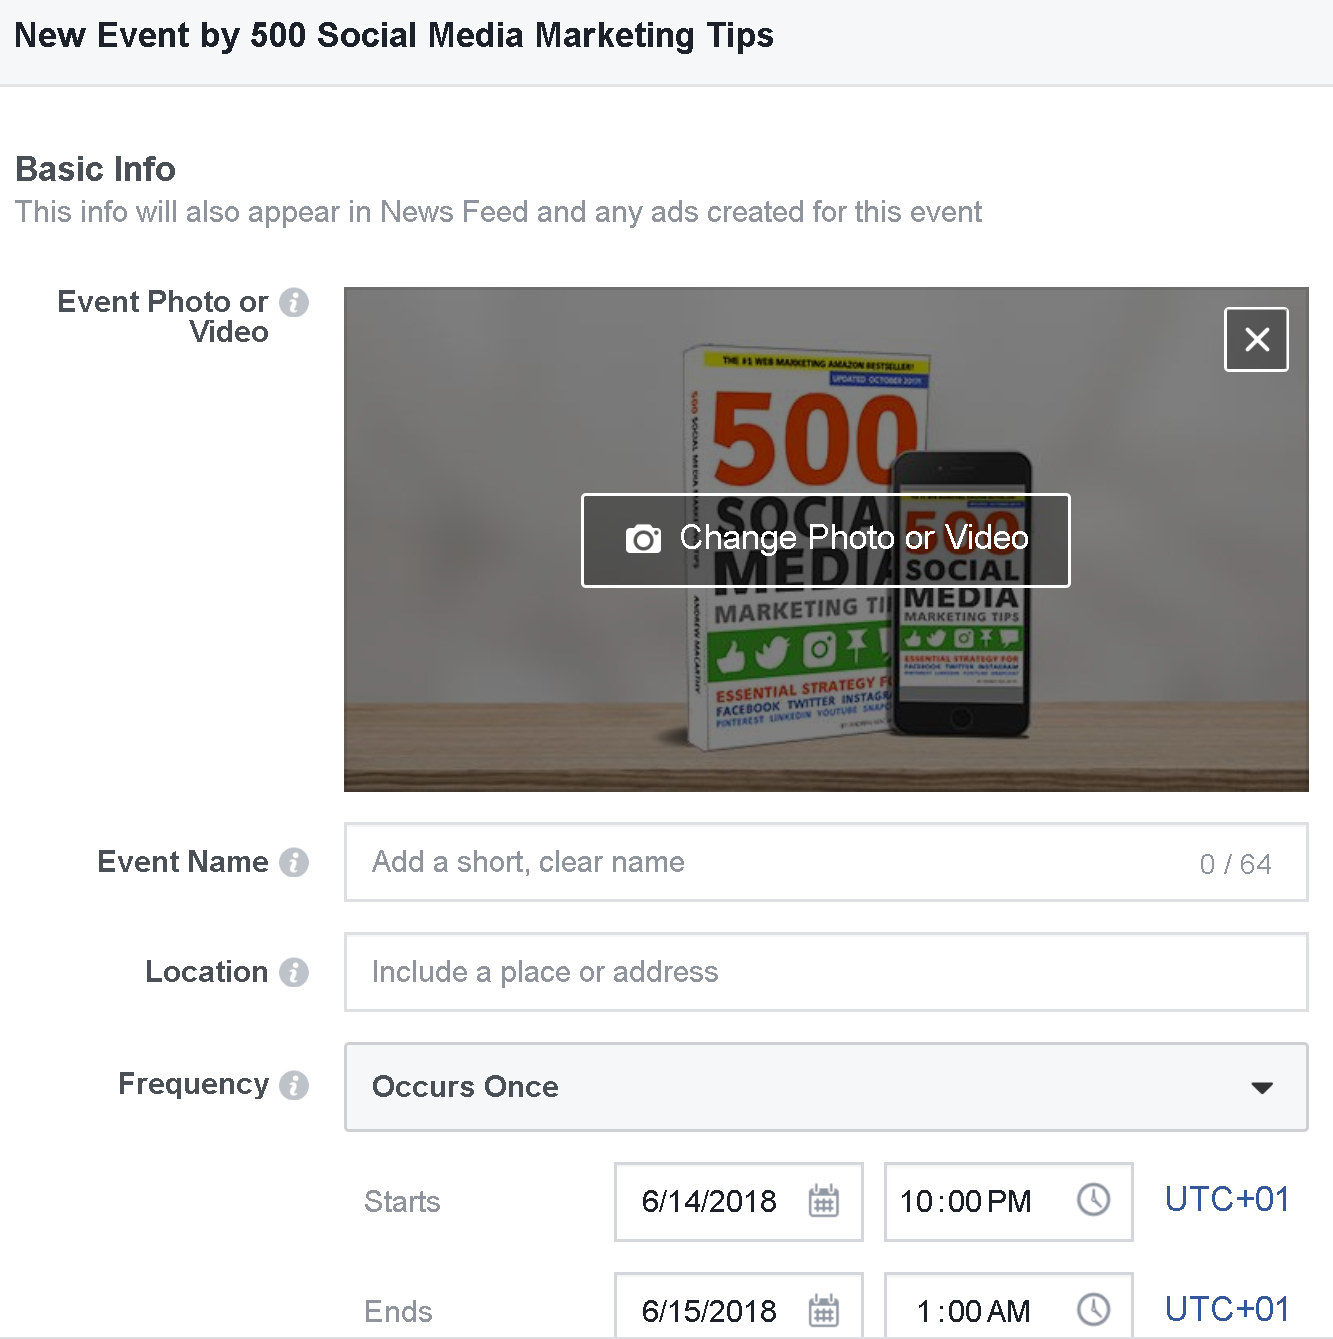
The first step is your Event photo or video. The optimum image size for Event cover photos is 1200 x 628 pixels, while videos can run anywhere from between 30 seconds and 5 minutes long.
Think of your Event photo as a visual ad for your event, as it's what will appear when the post is published and shared across the site - on your Page, in the News Feed, and in paid ads. Choose an image that will catch people's attention and cause people to stop in their tracks to check out what you've got planned.

Once that's done, add:
- The Event name: Use a clear and short event name. Long names can get cut off when viewed on different displays, so avoid duplicating location info in the name.
- The Event location: Facebook will generate a map to show attendees where to go. Use a location that corresponds to a Facebook Page or a Facebook-suggested location so people nearby can discover and learn about your event through suggestions. Adding an address will also mean that your event, when published, will appear in the Events Near Me section of the site so people in your vicinity can stumble across it when browsing events.
- A start and end date and time. For events lasting longer than two weeks, Facebook recommends creating separate events with their own time and location.
Fill out and optimise your Event details
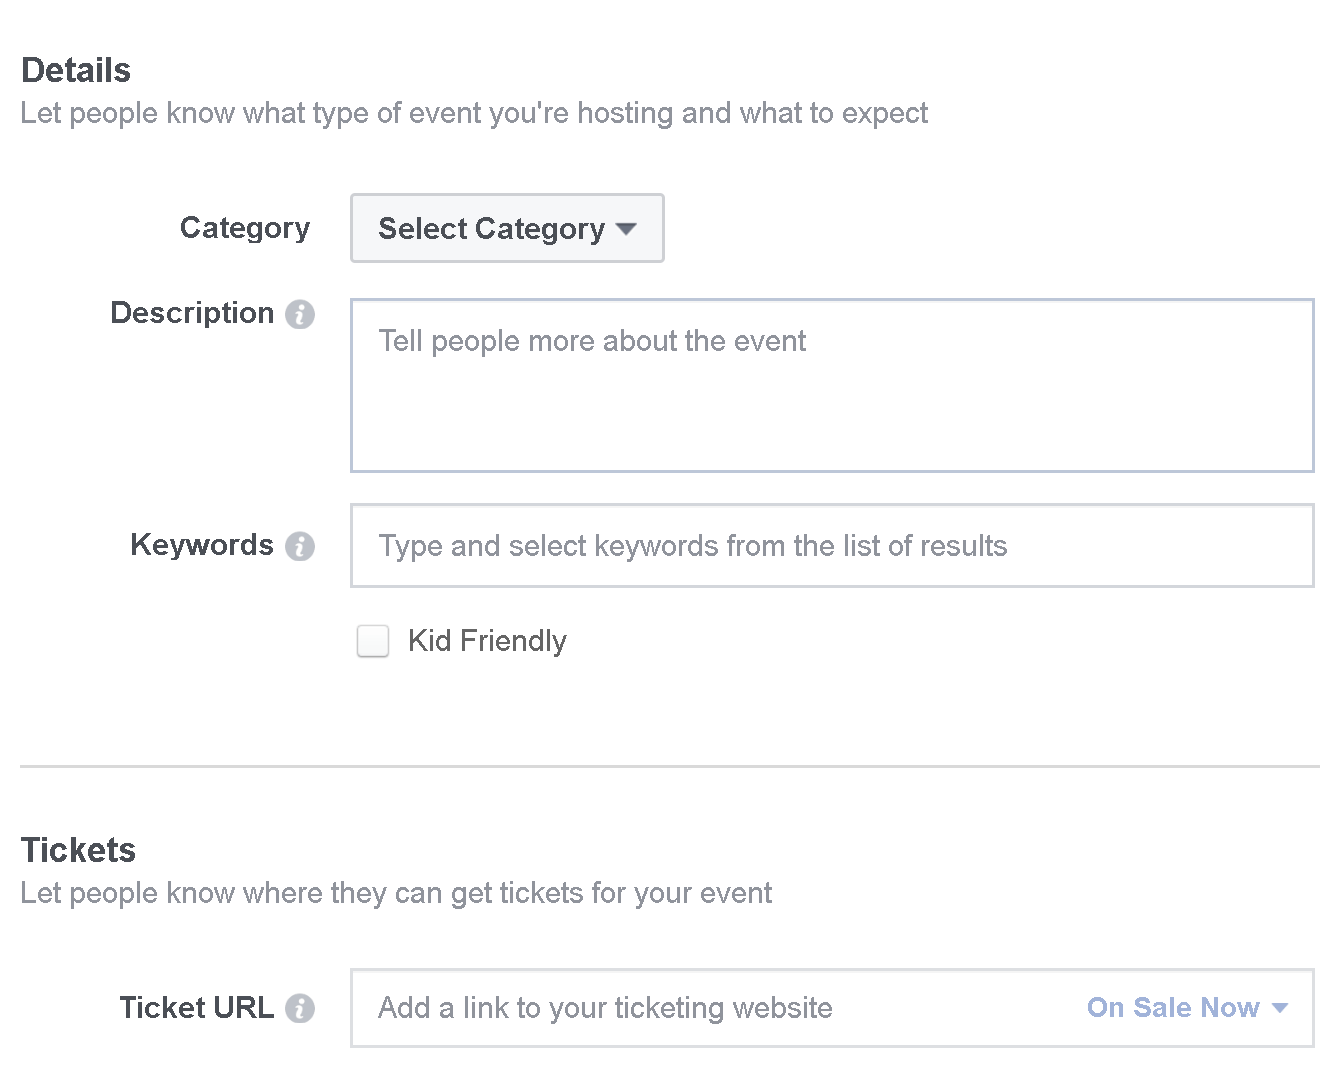
Once you've piqued someone's curiosity enough to view your Event page, use the Details section to tell them more about what they can expect, and to encourage their attendance. Adding relevant keywords allows Facebook share your event to the people who will most likely be interested in attending.
If you're selling tickets to your event, add your ticketing website link to the Ticket URL field. This makes it easy for people to buy tickets and unlocks the ability to create ads that can help drive ticket sales.
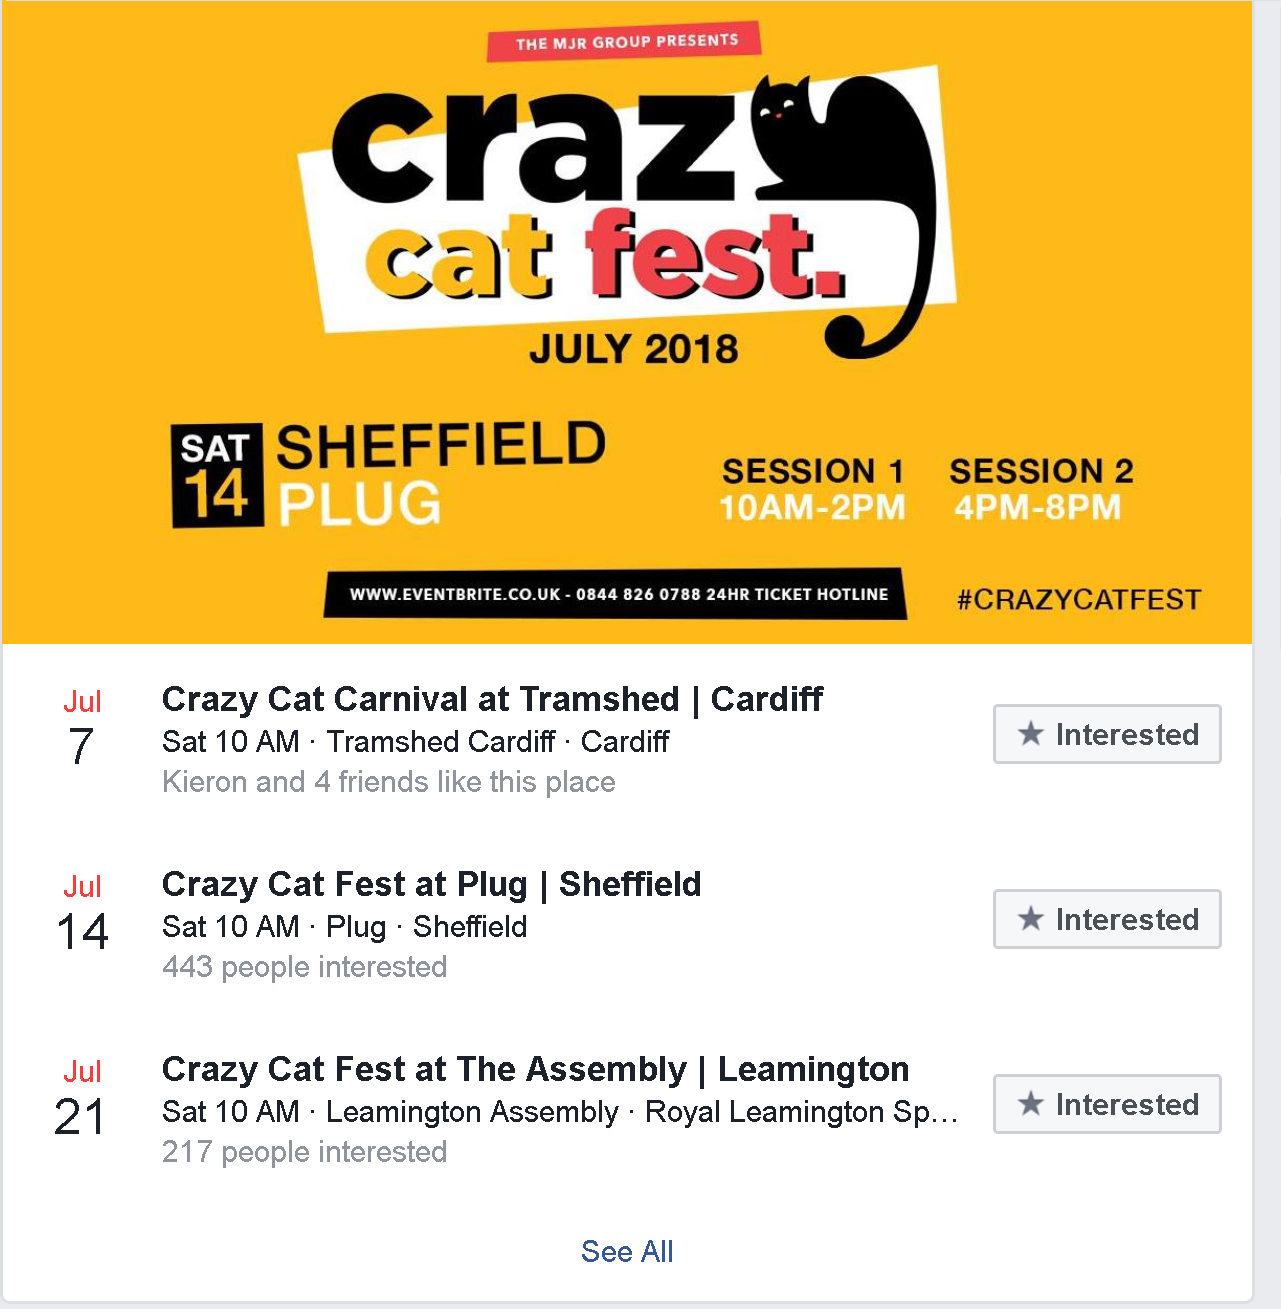
Check out how The Great Gin Festival uses its Details section to sell its event:
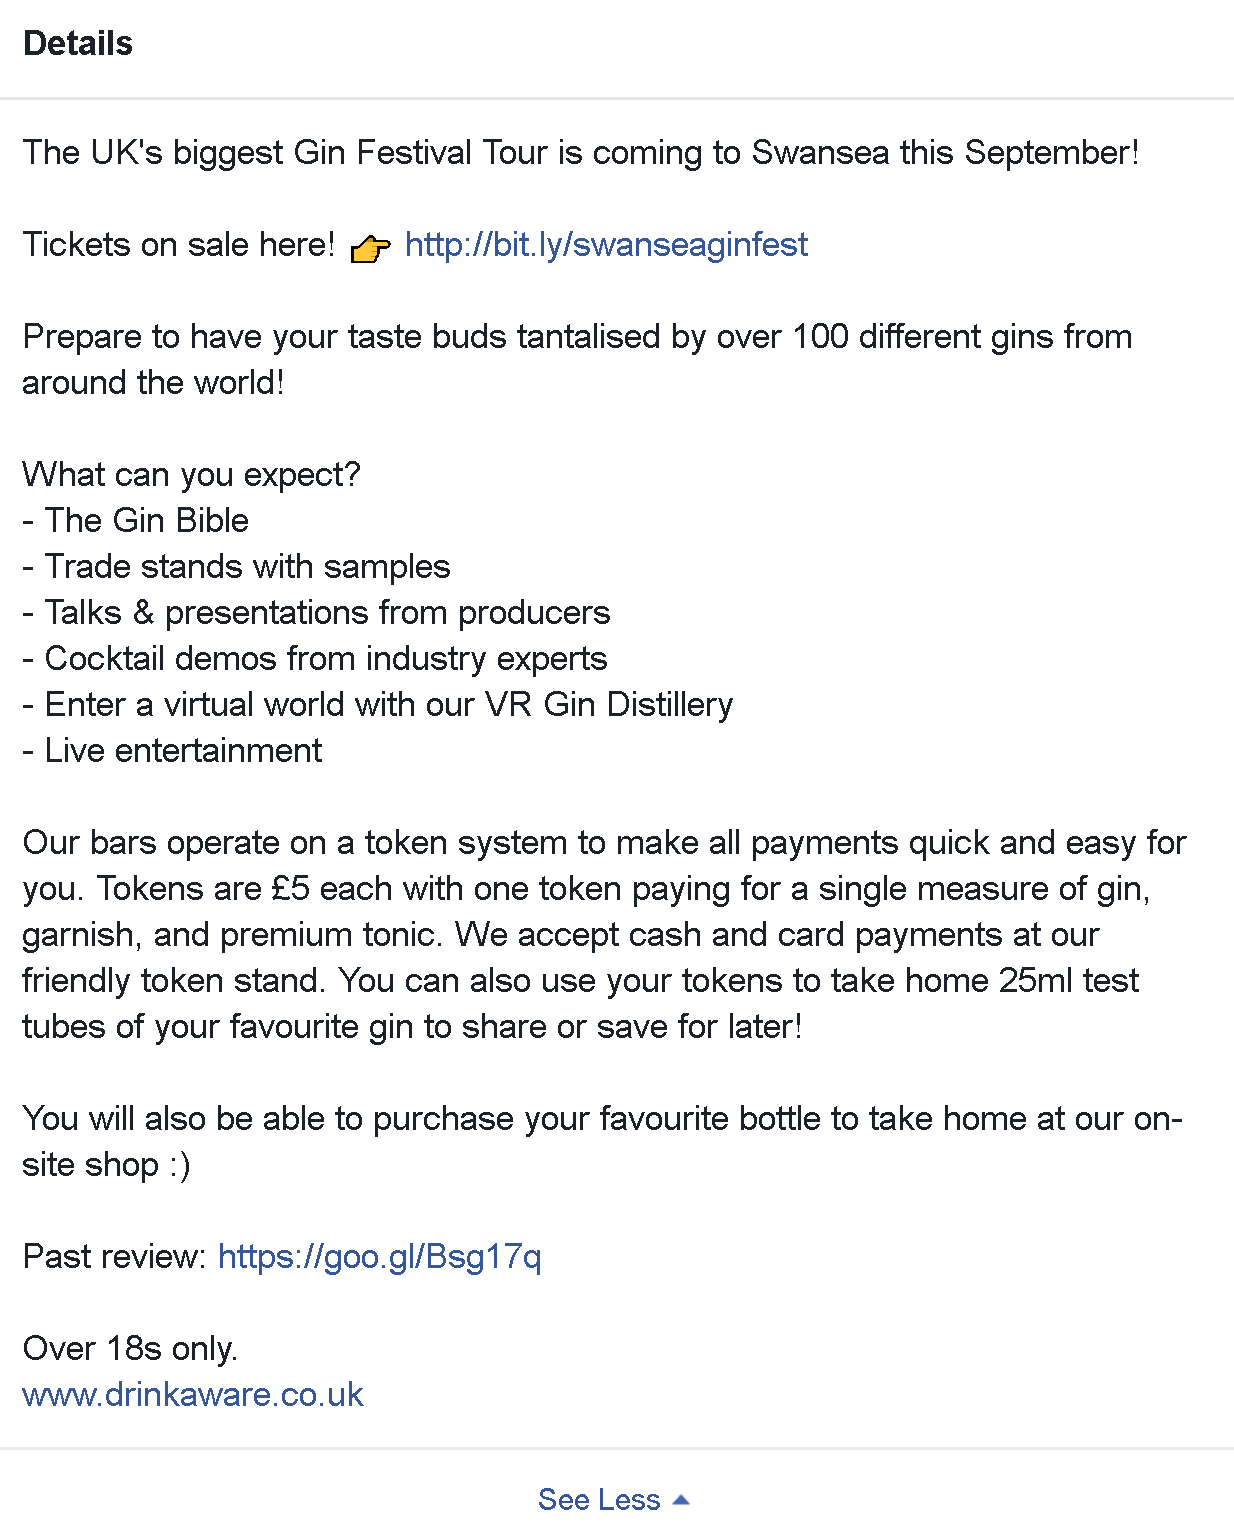
Some of the key details include:
- A reminder of the event name and location.
- A link to where people can buy tickets - in addition to Facebook's own "Buy ticket" button.
- A clever sentence to sum up the event and hype it at the same time - "Prepare to have your taste buds tantalised by over 100 gyns from around the world!"
- A bullet-pointed list to spell out what attendees can expect.
- Additional details to explain how the event works and satisfy any questions or objections that someone might have (token system, payment options, and past reviews etc.)
Some great ideas here for you to mirror in your own description. I would suggest adding another call to-action and ticket link at the bottom of your details, and also a suggestion that encourages readers to share the event with their friends.
Also, if you mention other people or Pages that will be appearing at your event, Use @mentions to tag them so people can learn more about them.
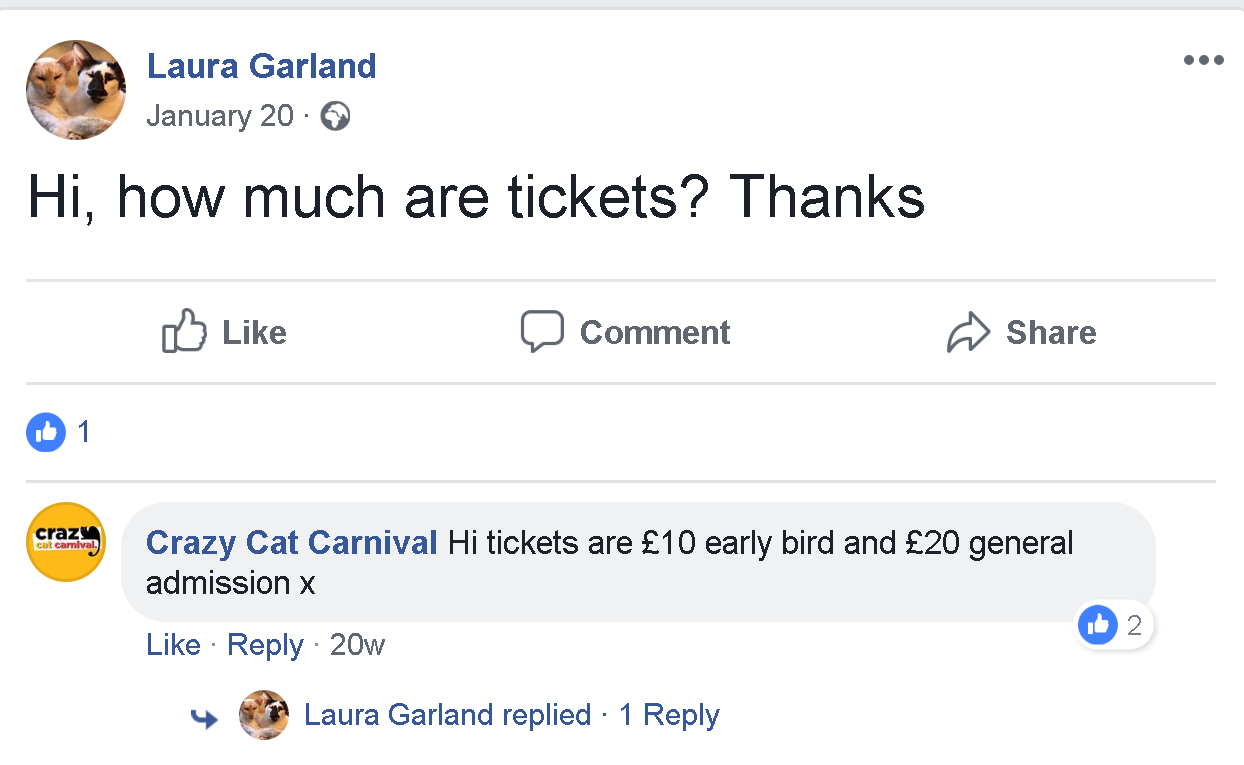
You can also use the Details section to let people know that they can comment in the discussion section with any further questions they might have, and that you'll get back to them with an answer ASAP.


It's also worth noting that event details are condensed to show approximately the first 10 lines until a user clicks "see more" to read the rest, so try to include the most important information right at the top of your description.
Choose further options, promote by adding co-hosts

When you add friends or Pages as a Co-host to your event, they will be able to invite all of their friends and followers and the event will be added to their Facebook calendars, so it's a great way to help spread the word. Co-hosts could be the event venue, sponsors, performers, vendors, etc. When you've finished and you're happy, hit Publish.
Promoting your Facebook Event: Boost, Ads, and Frames
When your Event is created, Facebook will publish a Page post to promote the event and also add an Events section to your Page. Both give people the chance to see what you're organising, and give them the chance to indicate their interest or intention to attend.
Before we get into paid promotion, there are a three simple things that you can do to make your event as visible as possible to people who visit your Page:
1. Change the main design elements of your cover photo to promote your event.

In the example above, Swansea Summer Ball uses its cover photo to promote the event. The full image also displays the link at which to buy tickets, but - bit of a fail - it's cut off because the creator hasn't worked within the recommended cover size boundaries. But you get the idea!
The organisers have also added a "Book Now" call-to-action button beneath the cover photo, and even been updating their profile photo periodically to let people know how many tickets are left - a subtle FOMO (fear of missing out) form of marketing.
2. Pin your event post to the top of your Page to make it more visible to visitors.
Click the three little dots next to the event post and choose "Pin to top of Page". Any subsequent Page posts will appear below it.
3. Re-order Page sections to place Events near the top.
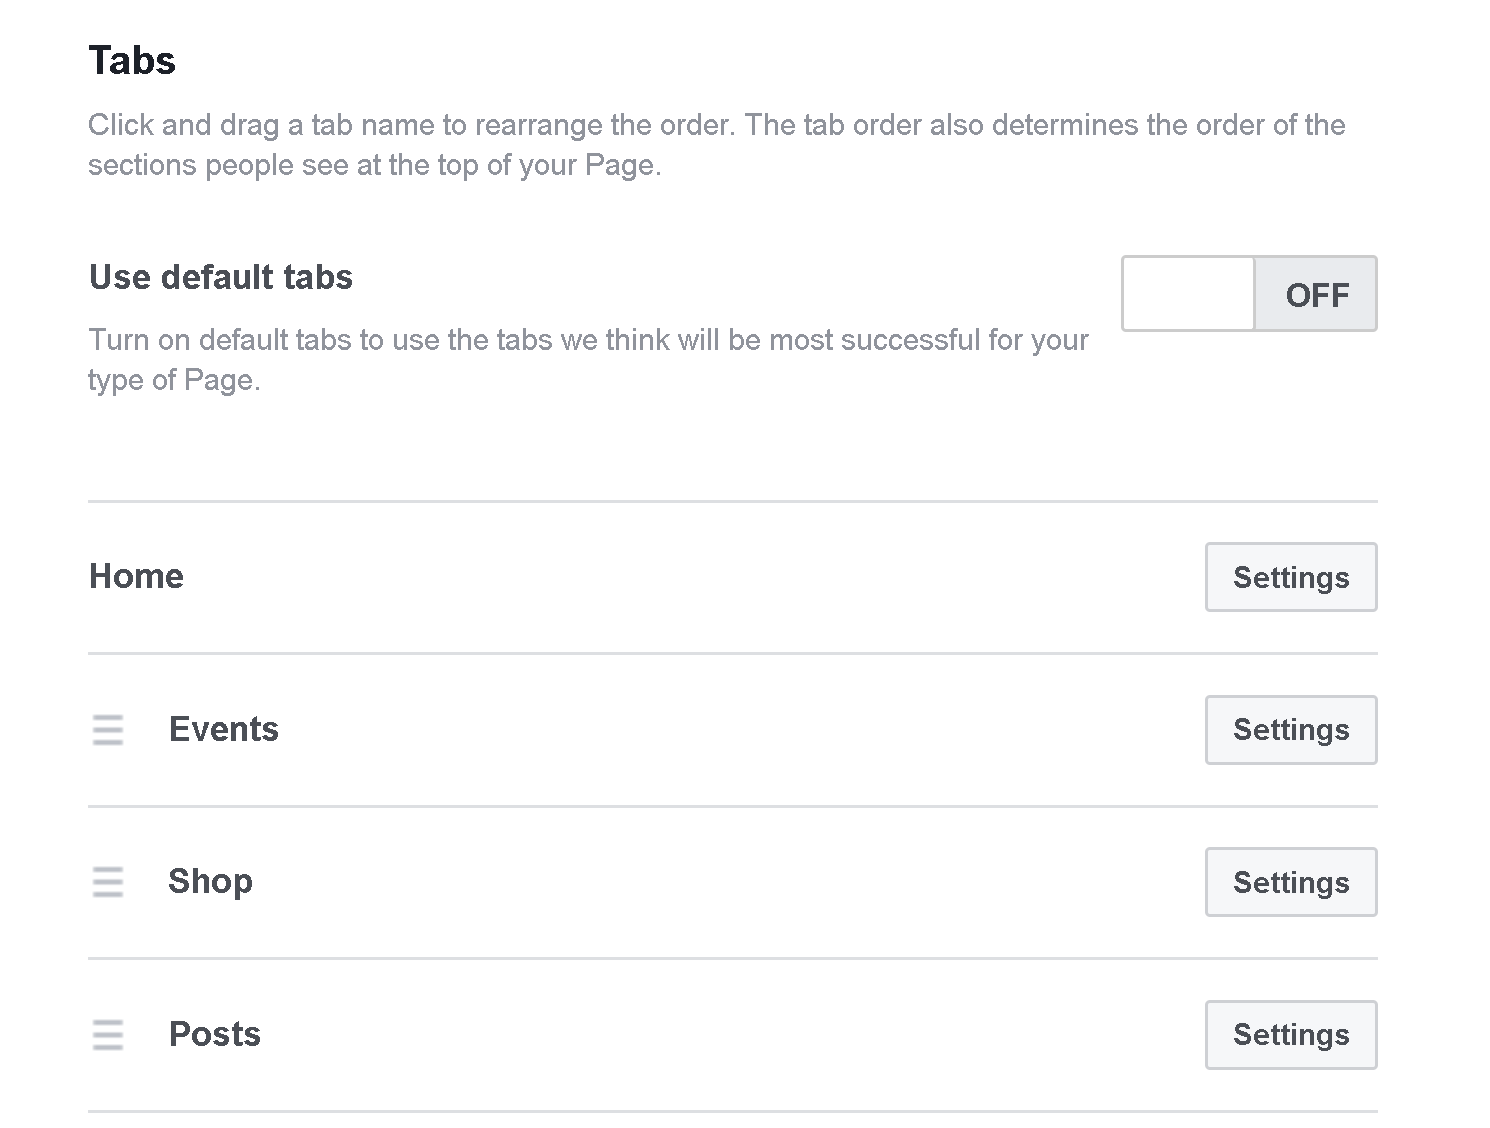
Visit Page Settings -> Edit Page and scroll down. Here, you'll see the option to drag-and-drop your Page's main tabs into whichever order you choose. For the duration of an Event's promotion, you may want to shift it to the top of the list so that it appears first to visitors on your Page.
Boost your Event Post

After you publish your Event, you'll be able to Boost its visibility through a button on the post, or within your Page's Events tab, turning the post into an ad. The options for boosting an Event are the same as for boosting an ordinary Page post, and you can choose either to Boost the post to raise Get Responses or direct people straight to your ticket website.
- Click Boost Event from your event page or post.
- Choose Reach More People or Increase Ticker Sales.
- Select your audience. You can target people based on gender, age, location and interests. You can also target people – and their friends – who've liked your Page.
- Choose your budget and schedule.
- Click Boost.
Promote your event through Facebook Ads
Facebook event ads can help you increase awareness, RSVPs and ticket sales for your event on Facebook. With event ads, you can target people who might be interested in your event and re-target people who've shown interest in the past.
To begin to create an event ad,click the three dots next to the Share button on your Event page, and choose Sell More Tickets.
Choose your Event ad objective
Once you've created a Facebook event, you can create an event ad when you choose the Traffic, Engagement or Conversions objectives in Ads Manager. The call to action button on your event ad will either say Interested or Get Tickets depending on your objective. Choose the objective that best matches your goals.
The Traffic objective helps to drive clicks to your website or app to sell tickets. Creating event ads with this objective will show an Get Tickets button to people who see your ad.
The Engagement objective helps to get more RSVPs for your event. Creating event ads with this objective will show an Interested button to people who see your ad.
The Conversions objective helps to increase ticket sales that occur on Facebook. Creating event ads with this objective will show an Get Tickets button to people who see your ad.
Design your Event ad
The way you design the image or video you use for your Event ad should follow the same best practices as your Event cover image. Remember to keep any image text to a minimum (Facebook limits the distribution of ad images with text that covers more than 20% of the image). You may also want to run A/B tests on the ad image and text, to determine which ad your target audience responds to best.
Target your Event ad
Other than the traditional target audience parameters that you can select in Facebook Ads (location, age, gender, interests, etc.), there are three arguably more powerful ways to find an audience for your event and make the most of your ad budget. Here's an overview:
Create an Event Custom Audience

You can connect with people who show active interest in attending your events by creating an Event Custom Audience. You can include or exclude people who have responded Interested or Going to any event on your Page.
To create an Event Custom Audience of people who've engaged with events on your page:
- Go to your Audiences in Facebook Ads.
- Click the Create Audience dropdown and choose Custom Audience.
- Click Engagement.
- Click Event.
- Click the dropdown and choose the option you want to use in your audience. Depending on your event and whether you work with a Facebook ticketing partner to sell tickets, you might have these options:
- People who have responded Going or Interested
- People who have responded Going
- People who have responded Interested
- People who have visited the event page
- People who have liked, shared or commented on the event page
- People who have engaged with the ticketed events on Facebook and either purchased or didn't purchase tickets
- People who have purchased tickets on Facebook
- People who didn't purchase tickets on Facebook
Fill out the in the past field with the number of days you want to go back to find people who interacted with your event for inclusion in your audience. You can go back up to 365 days.
Click the Page dropdown and select the Page that has the event you want to use to create your audience. Click +Select specific event(s) to easily search your events. Optionally, click Include More and Exclude to add more criteria to your audience. Optionally, add an audience name and description. Click Create Audience.
Your audience will start building and might take up to 24 hours to complete depending on the time frame you chose.
Use Lookalike Audiences

`
Use Ads Manager to upload a list of people from email lists or a list of people who have bought tickets in the past. Facebook will use this information to target similar people based on their Facebook data and browsing history.
Create a Facebook Lookalike Audience:
- Go to Audiences under the Assets section of Facebook Ads Manager.
- Click the Create Audience button and choose Lookalike Audience.
- Choose your source, including people who have liked your Page, interacted with your content, your email list, etc.
- Choose the country/countries where you'd like to find a similar set of people.
- Choose your desired audience size with the slider, and click Create Audience.
Use your Connections

Target people and their friends who've responded to your event or any event from your Page by using the Connections field when creating your ad. You can also exclude people who've already responded to your event.
- In the Audience section of your ad details, click the Connections drop-down that says Add a connection type.
- Choose Events and then choose People who responded to your event.
- Click Save This Audience.
- Fill out the rest of your ad details and click Continue to keep creating your ad. Click Confirm when you're done.
Create a Facebook event frame for fans and attendees
As well as using ads to promote an event events created via a Facebook Page, you can use Facebook event frames to use the goodwill of fans to help promote it for you. Event frames are profile and page photo overlays that your attendees can use to showcase the event to their friends, followers, and fans.
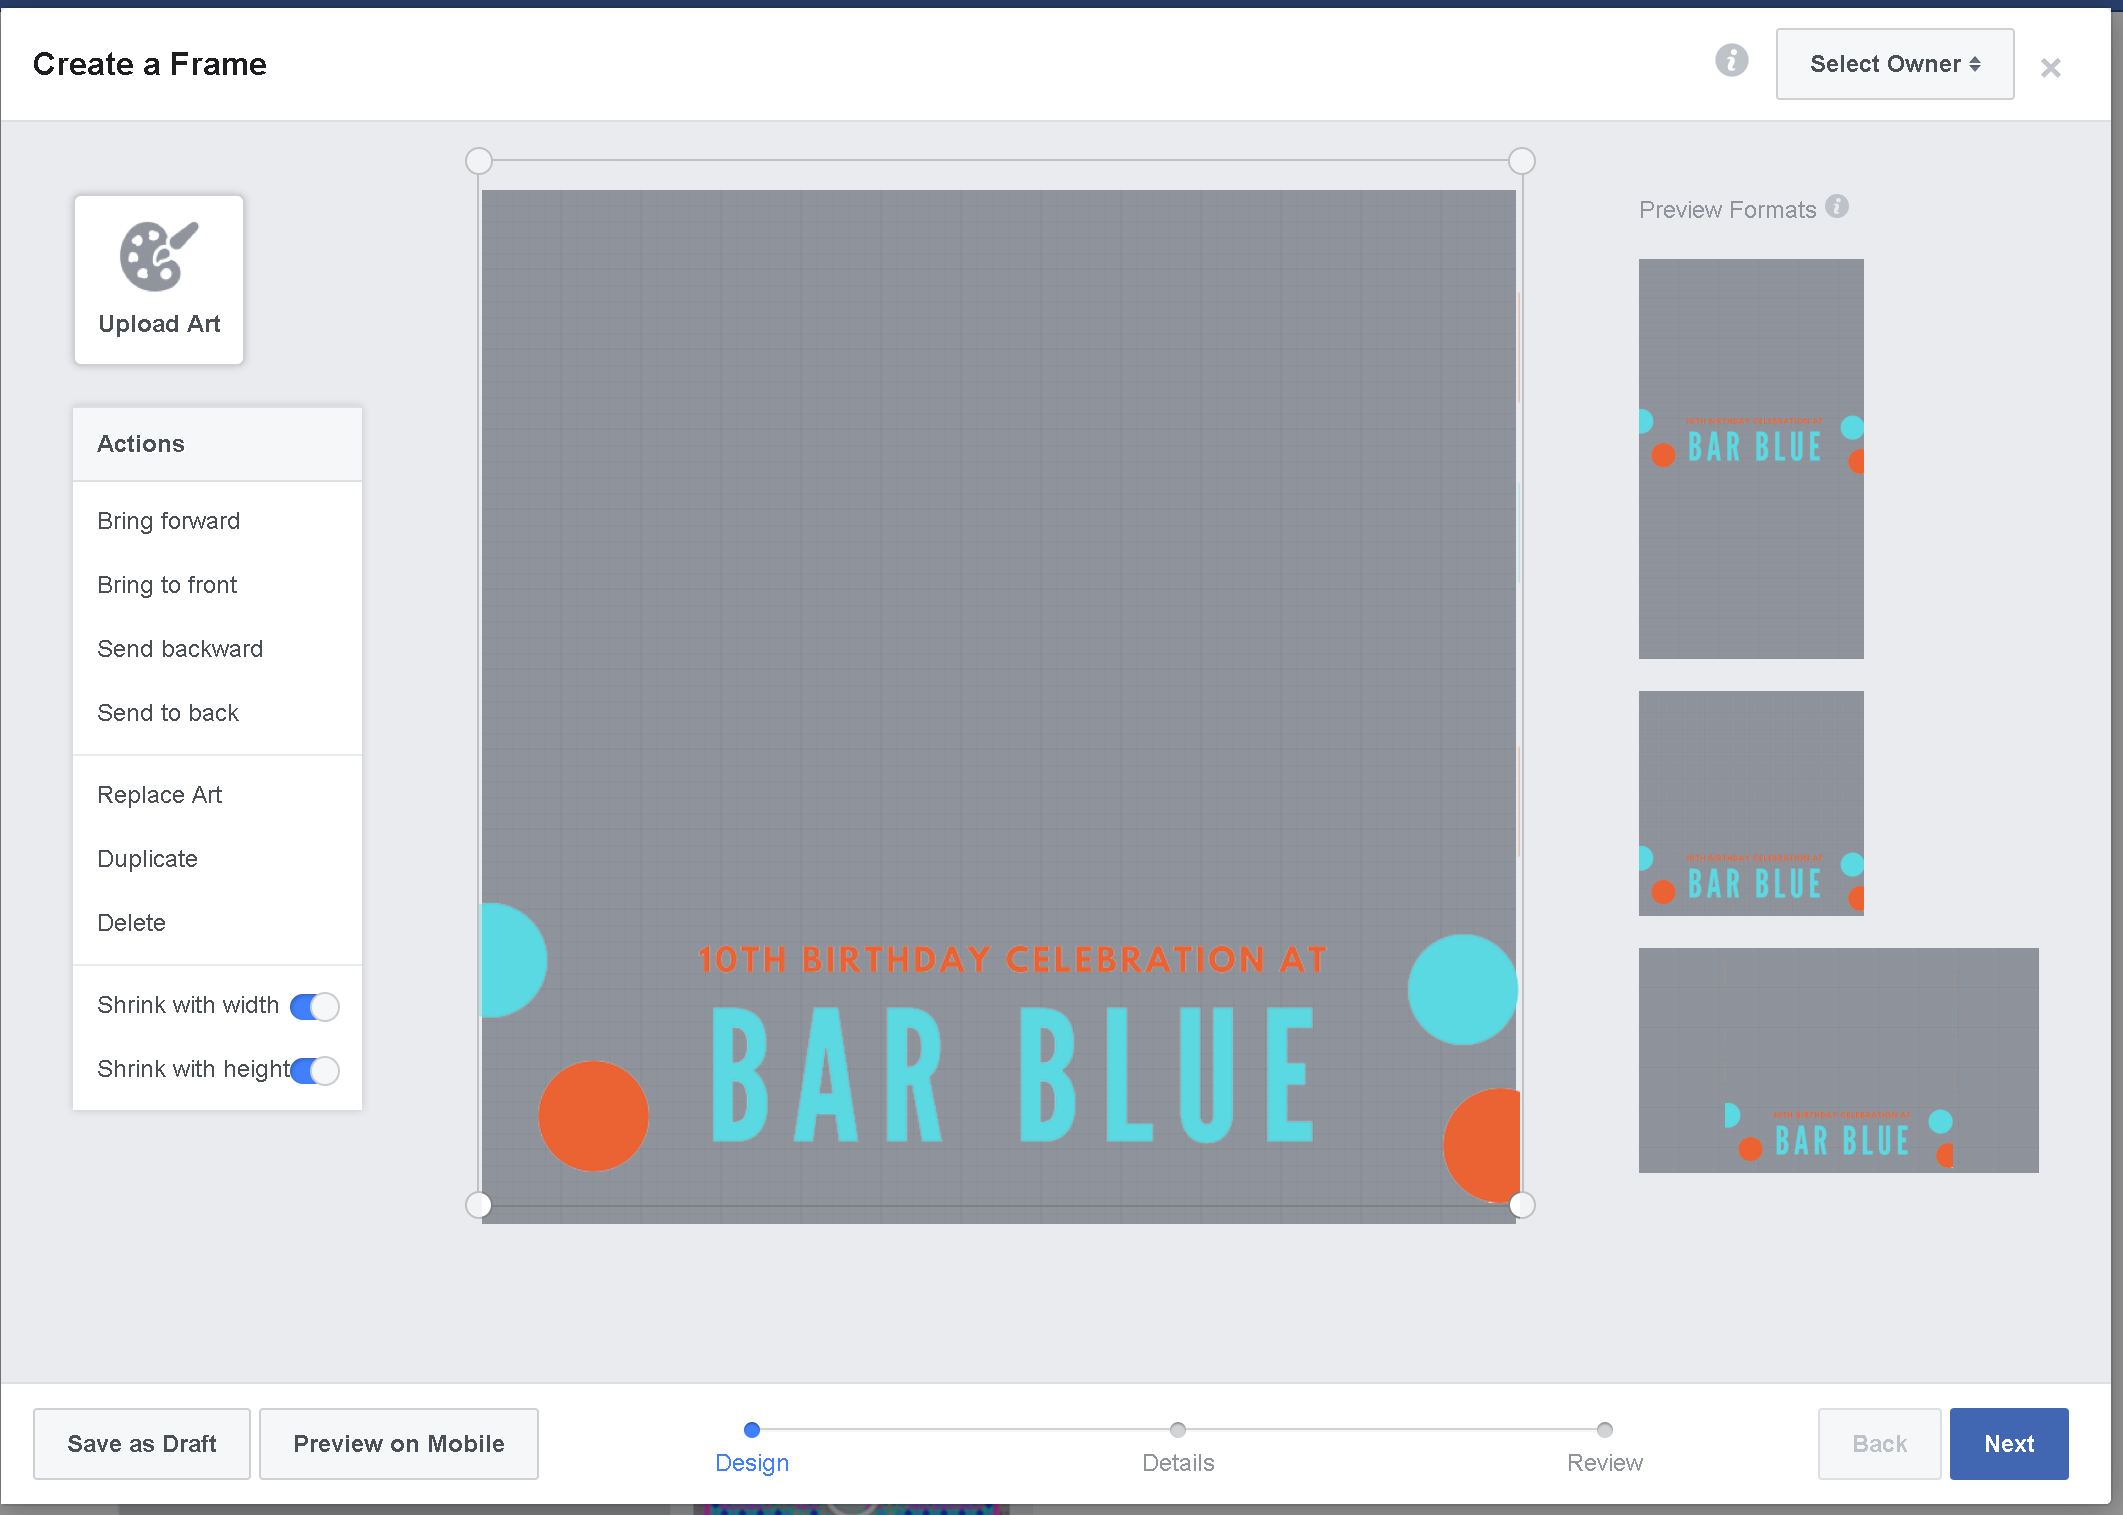
To begin creating an event frame, use Facebook Frame Studio in the Camera Effects Platform (https://www.facebook.com/fbcameraeffects/)
Driving Leads During And After your Event
Promoting your event and business doesn't stop after the run-up to it and its launch. There are plenty of ways that you can use the event itself - and the immediate period of time afterwards - to gather leads and build brand awareness·
- If your event is ticketed, you can offer tickets (including free ones) through a service like Eventbrite to register attendees for your online or offline event. Anyone who purchases a ticket becomes a part of an exportable list of contacts that you can use as a lead. An additional way to capture leads using your Facebook events is to create lead ads and ads for the lead generation pages on your website. Target your ads to an audience of people who responded to your Facebook event.
- ·Stream live from your Facebook event to encourage viewers to attend or to show them what they’re missing out on. In the Facebook mobile app, go to your Facebook event. Tap the status update box and look for the Go Live option.
- ·Keep the magic of your event alive until the next one arrives. After it’s over, thank attendees on the event page and remind them when the next event will take place. Encourage attendees to share their favourite stories, photos, and videos on the Facebook Event page and their own profiles. Of course, you can do the same on your own Page.
- ·Use the Event’s page to promote your Facebook group, so that event attendees can join to network with other event attendees, organisers, speakers, and sponsors in a more permanent location.
- ·Facebook event attendees (or those who engaged with your event page) can be used as part of a target audiences in future Facebook ad campaigns, meaning that you can promote your business’ products, services, or future events to those who engaged with your Event page.
Note: Page admins can easily repeat a Facebook event with the Create Repeat Event option in the drop-down box on your Event page. In addition, to prevent the need to invite fans to events within their area, you can invite them to subscribe. When a fan subscribes they will automatically be notified when your event is in their locality – ask them to subscribe by clicking on “Events” below your Page’s cover photo and hitting Subscribe.
Over to you
Does your business make use of Facebook Events? Will you be putting any of the strategies in this post to use for your own brand? Are there any key strategies that I have missed? Let me know in the comments below!

Andrew Macarthy is a social media consultant and the author of the #1 Amazon Web Marketing Bestseller, 500 Social Media Marketing Tips.
Buy 500 Social Media Marketing Tips
Amazon US: http://www.amazon.com/dp/B007L50HE6
Amazon UK: http://www.amazon.co.uk/dp/B007L50HE6
Follow Me:
http://www.facebook.com/500socialmediatips/
http://www.twitter.com/andrewmacarthy
http://www.pinterest.com/andrewmacarthy